Sunday, August 2, 2009

Lino printing trials

I'm having a go doing lino printing. The printing is not so hard, the cutting I find a bit tricky. I guess it's a matter of getting used to it. I can't say I truly enjoy the actualy cutting of the lino. I am impatient and want to get to the end quickly. I can see how lino cutting for me would be a fantastic excercise in practising patience, letting go and paying attention. It's not that I want the image to look a certain way, it's just that the printing is so much fun. My favourite part of this technique is the rough edges and the cut marks that occasionally show themselves here and there on the print. It adds character when it's imperfect. i really like the one on the brown kraft paper.


Decorating

I thought I would share some fun decorating tips with you. I will put paint and/or texta to just about anything. When I purchased these mini storage units from IKEA I couldn't resist decorating the plain exterior. I used plain black and brown textas and was very happy with the result. Incidentaly those gorgeous spools of orange and red twine inside one of the drawers were purchased during the recent Magnolia Square market in Sydney from HEAVEN IN EARTH. They are a garden accesory business and have beautiful products.


Round bits of timber which I picked up at a construction site next door. I painted them and put some twine through the holes. They now hang on my wall in the dining room. Something differet. Again just texta on wood.


I picked up this old drawer from out the front of a nerby house during a council collection. There were 4 other drawers like it and I couldn't decide whether or not to take them, I thought about all the junk I already bring home and then don't know what to do with. I cleaned it up and of course painted it. I loved the result. Unfortunately by this time the council truck had already picked up the remaining 4.


This is a little wooden tray that I picked up at my local St Vinnies. I absolutely fell in love with it the moment I saw it. There is something so homely, warm and comforting about it I find. I can't stop looking at it.

Sunday, July 26, 2009

Colourful fabric bits

Hello, back from the illnesses that have gripped my family and myself for nearly two weeks. The silence from the lack of coughing in our home is lovely.

A little while ago I wrote about some fabric bits and pieces that I have left over from some experimenting. I also wrote that I was going to put all the pieces together and make some wall hangings. That is still the plan I'll just have to wait till I find the time! For now I'd like to share with you all the results of all my dabblings with fabric, paint, lino, brushes, fabric markers, stencils and a silk screen. One thing I must say about them all is that I love each one. None of them are particularly ambitious pieces of art. They were not thought out or designed. I made each one because I felt that I wanted to and I used the medium that suited me at the time. I had no particular expectation of any of them and just accepted each one as it turned out. I'm not good at drawing but I'm good with colour and the older I get the less I am bothered about the abilities I supposedly lack. This is something that I have only just recently realised about my work and it has deepened my love for it. I realised that I really don't expect wonders from any piece that I undertake. I noticed that I allow myself to draw or paint however I see fit and don't WANT a "result". Does that make sense? It frees me to think about my approach in this way. And the freer I feel the more I love what I do. Anyone can recreate any of the pieces shown below and if it will give you joy please feel free to copy any of the designs shown in this post. Or make your own. All you need is some fabric and some paints or markers and of course freedom in your artistic heart :)


These are all drawn onto the fabric first and then filled in with fabric markers. Inspired by Polish folk embroidery.


These were cut out from a stencil paper available from art shops. It's like a plastic kind of paper that gives you a sharp edge when you print it. I put the cut out onto the fabric and then squeegied some paint through a silkscreen. The one below uses the same method.


These were just painted straight onto the fabric with a brush.


Again drawn with a fabric marker and then filled in with more fabric markers. I then stitched it onto some nice orange fabric.


Drawn and painted again.

These two are my favourite because they're so happy and vibrant.


More cutouts stencilled onto fabric.

The one on the right is a lino cut printed onto calico.

Saturday, July 18, 2009

That dreaded flu

Just a quick hello today to all my wonderful visitors. I don't know anyone in Sydney who isn't sick with some type of cold or flu. My children, partner and I are all sick and we are taking it easy until we recover. I have not seen a flu epidemic like this before. I hope where ever you are the nasty flu virus won't get you and if it has I hope you get well soon. I will blog hopefully in the next few days. Take care and stay warm if you're in the winter season!

Sunday, July 12, 2009

Changing styles and colours

When I started Laikonik 3 years ago I had no idea of what exactly it was that I was going to be selling or making, who I would sell it to or where I would sell it. The very first things I made and sold were these small hand made photo albums which were covered in hand painted cotton. I fell in love with the process of painting on fabric and have never really deviated from that too much.

My very first stall was at the St Ives Heritage Craft Fair market in Sydney. Only my friends who came to the market to share my excitement bought from me. No one else did. But that wouldn't stop me. i loved making and decorating things. Anything really but the whole thing about paper and fabric and painting and gluing and creating something useful made me feel great inside. So below are images of the very first albums and notebooks that I ever made.
I haven't looked at them for a long time and when I dug out these images today I realised just how much I adored seeing them all together on my little market stall each month. I also just realised that colour is what I love most about my designs.


These were A4 dry mount photo albums. I made the pages in different colours to make them different from the standard black.


Smaller photo albums. Also dry mount but A5 in size.


Notebooks covered in hand painted cotton which was always fun to paint. These notebooks were stitched by hand and included a button for winding the cotton around and "closing" the book.


These were great and always sold very well. Tiny little pocket books about A6 in size with multi coloured paper inside.


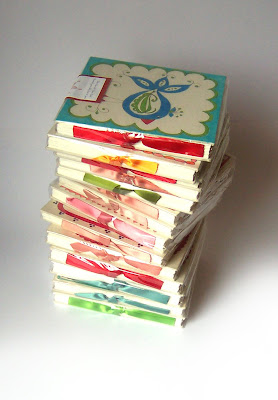
Mixed collection of all the photo albums and notebooks.

Later on when I started making the Once-A-Year books (for chronicling the first 18 years of a child's life) I would hand paint the covers. Since I was only selling about 5-10 books a month I could get away with that and the covers were always different. Below are some of the designs I used to sell. Now I have the designs screen printed onto the fabric in various different designs and colours. The books now sell all over Australia and in Belgium and have been featured in several popular printed publications as well as on other blogs.

The very first Once-A-Year book designs.

Later I made the designs more elaborate as I started having fun with fabric paints and fabric paint pens.


These designs were a short fad, although I always loved them they were too labour intensive to keep up on a regular basis. By this stage I started thinking of screen printing.


A few more of the early hand painted range.


What I realised having looked at all these designs from the past is that I truly love colour. And so I have decided to start injecting more of it back into all my new designs which I am working on at the moment. Will keep posted about this...

If you would like to see the current design range of the Once-A-Year books please visit my website http://www.laikonik.com.au/

I am also planning on bringing back notebooks and pocket books for possibly this Christmas. If you'd like to be notified of all my new products and special offers please go to the website's contact page and email me to join the mailing list.

Sunday, July 5, 2009

DIY flower crown

Quite some time ago I made this flower crown as a gift for my daughters friends 5Th birthday. The crown was modelled on a traditional headpiece worn by traditional brides from the Lowicki region in Poland. (see image below).


My crown was nowhere near as decorative or beautiful as the real thing but I figured it would be something a little 5 year old girl would love. It was made more special because my daughter and I made it together.


The crown is made entirely from felt. The flowers, hearts and felt ribbons at the back are just cut by hand with no particular stencil or pattern. The actual crown piece (in orange) is cut from a heavy weight felt that I don't know the name of. I bought it in Spotlight (a large fabric store in Australia) and they didn't know what it was called either. If anyone knows could you leave a comment? It kind of feels almost like a felty carpet. All the decorations are just stitched on.


We cut the flowers out first and then matched up the colours and decided where they would go by placing them onto the crown piece while it was laid out flat. We glued the flowers on lightly with little dabs of glue just to position them into place and then I stitched each flower on. From the inside you can see that I covered up the stitches of each flower by gluing a felt spot onto each cross stitch. This is not a difficult project but it's time consuming. Set aside an afternoon especially if you're doing it with your child :)


Most importantly the birthday girl loved it!

Monday, June 29, 2009

DIY wallhangings

Some time ago I did a post about my new wall hangings that I now sell through various Australian retailers. I love wall hangings and always have. And I think they are very easy to make and hang in your own home. All you need is some fabric, some fabric paints and a sewing machine. I used calico for all these. The ones pictured below are some of the many I have made in the past.

The Elephant. I made this one by first drawing the design onto the fabric with a pencil and then redrawing the lines with a permanent marker. Every time I paint directly onto the fabric I always water down my paints instead of using them straight out of the tub as they are. The thicker the paint is the slower it will go onto the fabric and you'll find yourself painting using tiny strokes and constantly re dipping your brush. The watering down allows the paint to flow better along the fabric. The back of this wall hanging is left plain and the whole thing is sewn like a big pillowcase. As you can see I added felt tabs at the top just to make it a bit more interesting. Put a stick through the top and you're done! This one was for my sons room but he didn't like it so it now hangs in the entrance way.


These next three I made for my daughters room and she actually liked them! I made all three like patchwork quilts out of old bits and pieces of fabric that I hand painted a long time ago. I had a lot to chose from so I decided to do one in all pinks one in all blues and one multi-coloured. For the centre panel on each one I used a piece of her old clothing that she no longer fit into. Like the front of an old top or a summer skirt. In fact when I finished these I thought it would be great to make one huge wall hanging completely out of her old clothes. I may still get around to it. She has many years left of growing out of clothes. I also liked this idea as it made these wall hangings special and personal. And the sentimental me imagined that she may one day like to hang them in her own daughters room. Or better still add another few panels from her daughters old clothes or her own hand painted bits of fabric. Oh the possibilities of heir looming are endless!!


This blue one was put away as my daughter did't think it suited her room anymore. Please forgive the wrinkled state of it in this photo!

Over the next couple of weeks I will be making another wall hanging, again out of some left over pieces of hand painted fabric. I will post next week about the bits and pieces. For some time now I have been painting on and off and experimenting with different styles and techniques. So now I've ended up with a bag of squares and rectangles and as I like to say: "when in doubt make a wall hanging."

Till next week!

Sunday, June 28, 2009

The winners!

Hello everyone. It's moday morning and as promised here are the winners of the give away. I put everyones names into a box and asked my children to fish them out! Please email me your postal addresses laikonik@optusnet.com.au

Thank you for visiting and commenting! I hope you like the papers :)

veri maz
Sarah
Freckles
Barb Fisher
sneakycrafty

Sunday, June 21, 2009

First ever give away!

Hello everyone. I am loving these new wrapping paper colours so much that I have decided to do my first ever give away and share them with some of you :)

It will be my way of saying thank you for visiting and reading my blog.


I have five packs of four colours to give away, see the picture below. Each sheet measures 760mm x 570mm and is a good quality 80gsm brown kraft which has been hand screenprinted. If you like the idea of wrapping up a present for a loved one in one of these just leave a comment here and next monday, 29th June I will announce the five winners. I am happy to post anywhere in the world :)


Cheerio!


Monday, June 15, 2009

New wrapping paper colours...

Is it June already!? I am embarrased that so much time has passed and I have not blogged. I hope you all haven't abandoned me out of boredom and lack of interesting reading material. I have a few new things up my sleeve and also over the next few weeks I will be sharing some of the things I have been dabbling in.

For now here is a sneak peak at the new colours of my wrapping paper. I am delighted with how they came out. The red and the white are the same and I now have a gorgeous light aqua blue and a mustard available.

This friday I will be emailing out a special offer for everyone on my mailing list. If you're not yet part of it please email me laikonik@optusnet.com.au to take advantage.


Thursday, April 30, 2009

Handpainted curtains

Hello, another long break. I have a good excuse! I have been very busy over these school holidays finishing a project that I volunteered for at my childrens school. When the kindy class needed a set of curtains for an opening in the wall between two rooms I immiediately put my hand up with a brilliant idea....... a set of handpainted curtains..... double sided. Having finally finished them I realise now I had NO idea how long something like this took. Now I know. These took me between 30-35 hours in total. But I do love the result. They look exactly how I wanted them to look.

SO.... if you are thinking of doing a set of handpainted curtains for your living room here is what I learned that I can shere with you:
Do measure correctly even if you have to do it three times to be sure. All four panels of these curtains were 30cm too short so I had to sew seperate hems to the bottoms. I chose to paint them solid so as not to hide the fact that they were a later addition.

Find a large enough floor space where you can lay each panel out flat. A garage is great just lay down some clean paper or a drop sheet so your fabric stays clean. I, for some reason thoguht I could do them at home on the dining table. that would mean painting in sections, constantly moving the fabric around, putting everything away at the end of each day and making sure the chlidren dont use it as a canvass. Floor is best.


Use correct fabric. These were double sided so each panel had two lengths of fabric and I couldnt use a heavy weight. I used calico which was ideal for this. If yours will be single sided a heavier fabric will be good.

You can find good fabric paints in any decent art supply shop. I watered my paints down to the consistency of a smoothie, bit runny but still sticking to the brush. If you use the paint straight you'll be painting one sqaure inch at a time and continuously dipping back and forth because the fabric just sucks it all up.

I had a vague idea of the design I wanted and drew it up in my sketch book. I used a symmetrical folk art style design so it was easy to draw it onto the fabric.


I first drew the design on with a lead pencil. This allows for making mistakes and going over them without having to remove the lines off the fabric. You can still see some faint pencil lines on these but they dont bother anyone. I used a fabric marker for the outlines and when I ran out of that I used a permanent marker for the rest. Then the painting. That was the easiest but took for ever. It was at this point I thought "why do I always come up with these great ideas and then volounteer to do them!"

The curtains were sewn like any standard curtain: a giant pillowcase turned inside out and ironed for a long time to get it all perfect.

This project is not hard just amazingly time consuming. If you feel inspired and you fancy trying something similar you could start off with something smaller like some cushion covers. Even ready made ones, just paint straight onto them. It's advisable to slip a piece of cardboard inside so the design doesnt go through onto the back of the cover.


After all my tiredness over this project I have been eyeing my living room curtains which are just plain off white......... watch this space!
I will try to get some better photos of the curtains and if I manage I wil post some more. These are not very good, taken at the end of a school day when lots of kids were running about.


Thank you for visiting!

Monday, April 6, 2009

Last Easter Eggs

If you're reading this and you're getting bored of Easter eggs I promise this is the last lot I will be talking about this year. I forgot I had these and since I bought them I have been wanting to feature them on my blog because I find them SO beautiful. I love these eggs because they are so basic in their design. The wood grain that comes through gives them a natural earthy feel which suits the colour choices perfectly. I bought them last year at Babushkas. It's a beautiful shop at Darling Harbour in Sydney. You can visit their website here. They have a stunning collection of Christmas baubles, Easter eggs, wooden boxes, shawls, nesting dolls and many other colourful Eastern European gifts. If you have a chance please visit as it's well worth it.


Monday, March 30, 2009

Even More Easter Eggs

It is Easter Egg season so I am excusing myself for featuring and talking about so many eggs. These here are by Carla Tomaszewski. An American egg artist skilled in Eastern European egg decorating techniques. Pictured below is her scratched Easter Egg range. A technique which I have attempted several times and left alone as Ihave found it too time consuming and at times frustrating and difficult to master. Carla tells me one egg can take her three hours to make. I'm not suprised judging by the level of detail. I have been greatly inspired by these eggs and will be having another go at this technique. I love these especially because they look exactly like the traditional Polish eggs. Technique and design is true to tradition. Something Carla is very passionate about. Go to her website here and you'll see a great deal of information about Poland and its history and traditions.

image source Carla Tomaszewski


image source Carla Tomaszewski


image source Carla Tomaszewski