Showing posts with label peronal projects. Show all posts

Monday, August 15, 2011

A wall hanging for Claudia

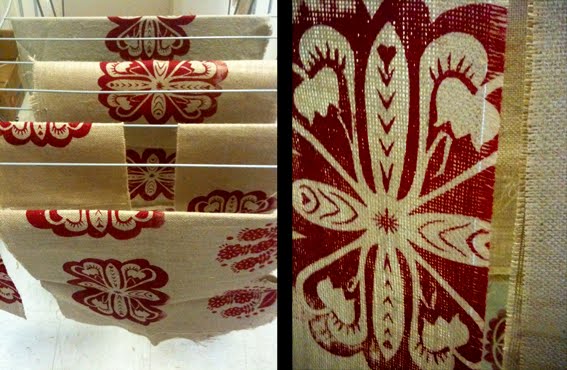
I have been very busy lately working on a myriad of fabric prints. I've made cushions, wall hangings, table linens, bags. I've screen printed my doona cover! I will be posting about all my wonderful projects ovr the next week or so. For today here is a wall hanging that I designed and made for Claudia whom I met recently. She is a designer herself and was very keen on my work and requested that I do a wall hanging for her home, on the raw hemp in white. So here it is below as well as the process I use for most of my printing. You may find it useful if you're planning on doing some printing at home.


Friday, June 3, 2011

Cushions and more screen printing

I have had a lovely time making these cushions out of some random pieces of screen printed fabric. I have been printing last week, pretty much anything that took my fancy. Most of the prints are from paper cut-outs. The fabrics are mixed and include: hemp canvass, silk/hemp, cotton, hessian. I am in the process of making lots of cushions, table runners, coasters and more fabric bags for the upcoming Lane Cove Alive Markets on Sunday 19th June 2011 from 9am till 3pm. Please come if you are in the local area.


This one is printed hessian. I like the way it comes out so rough due to the open weave of this textile.

Friday, May 20, 2011

Printing using a paper stencil

Here is how I screen-print my paper cut-outs...


I start with the paper cut-out and make a mask out of brown kraft paper. See where I marked it with the pen?


Then I stick the mask onto the silk screen with stiky tape.


I place the paper cut-out onto the fabric where I want to print it...


... and position the screen with the mask over the paper cut-out.


I print through the mask and voila!


Off to the drying rack :)


More on these table runners next week. I'll be printing more colorus onto them.

paper cut-outs for screen printing

Here are some lovely paper cut-outs I've just done. I am planning on using these as stencils through the silk screen and printing some more hemp with them. This time I'll be using different colours instead of the trusty red :) I'll post about the results soon.


On the washing line...

Here are some more screen prints from last week. Still drying after a wash in the machine. I am not precious about the prints and like the way they come out all roughed up and looking well worn. I have not yet decided what I will make out of these. Possibly some more table linen as that is my excitement at the moment :) ... stand by.


Raw silk on the left and hemp canvass on the right


Friday, April 29, 2011

Night Lights decorated with vegetable paints

I just love love these lights. So simple to make. I used A4 sheets of water colour paper and vegetable paints to do the designs. The dark pink is beetroot juice. You basically just juice half a beeteroot and paint with it. That's it. The green colour you see is spinach juice, same thing you just shove lots of spinach leaves into a juicer. And the orangey colour is tumeric mixed with water. It's a bit stinky when you paint with it but when it dries there is no smell. So I painted the designs on and when they dried I stuck a piece of double sided tape along one side and then rolled the paper into a cylinder shape and stuck the sides together. I use large tea light candles under the lights. Please remember if you're going to make these (I know this is fairly obvious BUT...) you are putting paper and naked flame together so make your lights wide enough so that the candle underneath doesn't touch the paper. Or put your candle into one of those plain glass tea light holders and then put the paper cylinder over the top. Don't they look lovely?

The following two light's were painted with beetroot juice.


The one on the left is printed with one of my designs, and the one on the right is painted with spinach, beetroot and tumeric.


Decorate your own crockery

I have been using Pebeo Porcelain Paint Markers for years mainly to decorate goose, hen and ostrich eggs for Easter. You can see some of my Easter Eggs from previous years on this blog. Last week I decided to give the Porcelain Markers a go on actual crockery. I love the result of these two jugs. Pebeo Porcelain Paint markers are available from just about any decent art supply shop such as Oxford Art Supplies or Eckersleys. They are so easy to use, you just paint your designs on then bake the crockery in the oven for 35 minutes at 150 degeres celcius.

The jugs you see below were plain and I added the red designs onto both of them. The taller one with the yellow stripe on the edge is a cheapy from Ikea and the other one is an antique clay jug which I picked up years ago from one of those antique shops in the country.


Cardboard houses

Hello friends :)
I have been keeping myself very busy over the last few weeks following my own excitement. It's amazing how nice it feels to listen to your intuition and then do what it tells you. Sometimes I come up with seemigly random things such as a desire to make a little cardboard house. But what all these have in common is that while i'm doing these projects I feel happy and inspired. And who knows where this will lead? So here are two little cardboard houses made purely for the love of it.

Here's the first one I made out of magazine back covers. Frankie and Artichoke to be precise. Both always have such great imagery. This house is a response to the still existing graphic designer/lover of architecture in me. I used craft glue to put it together.


This is the second little house I built. This one is made from scrap cardboard and has been painted with water colour on the outside and markers on the inside. It is a direct expression of my love for Polish folk-art and those old Eastern European villages. I love it!
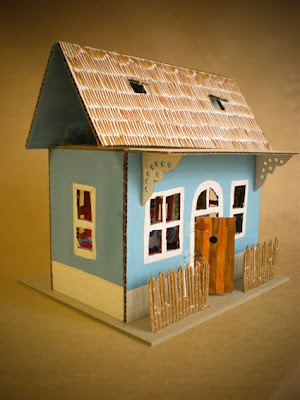


The roof comes off for easy access to the interior. I think my daughter will move her fairy family in here.


Monday, June 21, 2010

Exhibition photos

The exhibition opening night was fantastic. I know I said I was going to write about it the next day but.....

I will keep the words to a minimum and let the pics speak for themselves. The most exciting thing I'd have to say was meeting other artists who were interested in using eco materials and working with the environment instead of against it. This week there will be two sessions at the GAFFA organised by
The Hemp Gallery in partnership with Jaspers Village. This is an exciting project with a vision for a sustainable future. Contact the GAFFA gallery for more info.

And now for some photos!


My wall, I set up my Hemp paintings on one side and all my commercial work on the right.